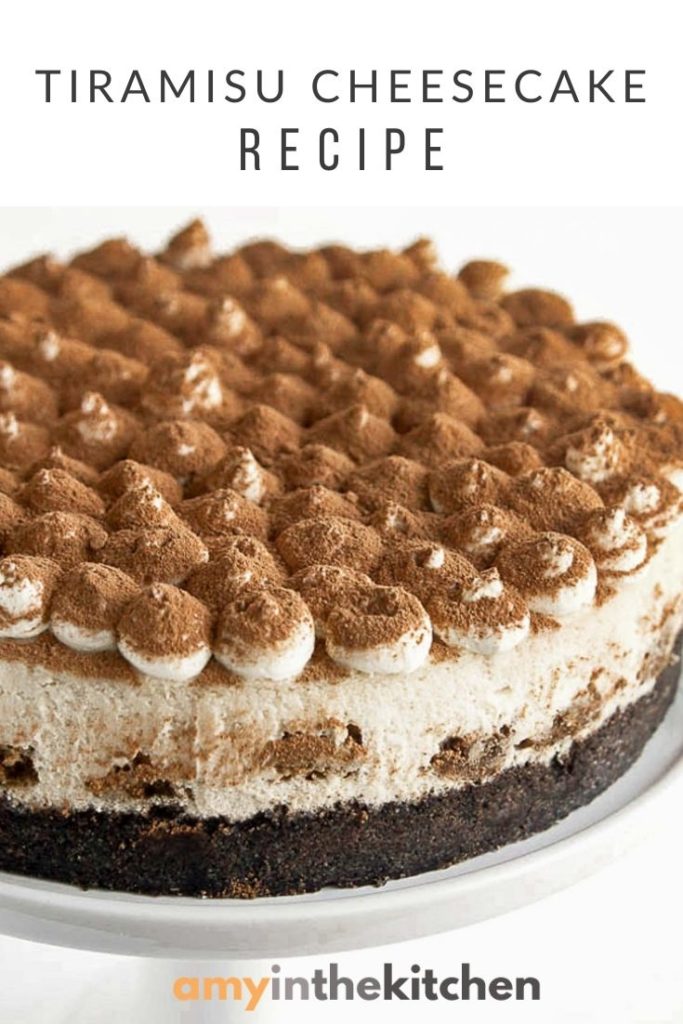
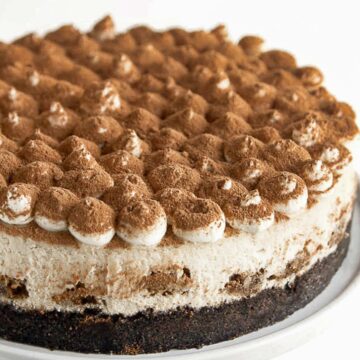
This Tiramisu Cheesecake recipe has a creamy coffee flavored filling with a white chocolate whipped topping and a dusting of cocoa powder. Cheesecake is the perfect dessert for holiday parties.

Italian tiramisu is a classic dessert recipe that is loved by many. Especially during the holidays. Our recipe takes the flavors of tiramisu and transforms them into a rich and creamy cheesecake that is simple to make.
Plan to make this cheesecake 1-2 days in advance as it needs a minimum of 6 hours to set properly before serving. A water bath is recommended to make sure the cheesecake bakes evenly and the outside edges do not over bake.
How to make tiramisu cheesecake
Here's a breakdown of the steps needed to make the best tiramisu cheesecake!
- Make the crust: Process the Oreos, cream center included, and the espresso powder until they are a fine consistency. Add melted butter to combine and press into the spring-form pan. Bake at 350°F for 10 minutes and set aside.
- Prepare the water bath: Lower the oven temperature to 320°F. Place a large roasting pan in the oven on the middle rack. Pour hot water into the pan, making sure it is about 1" in depth. Close the oven door.
- Make the filling: Bring the cold ingredients to room temperature before mixing for a smooth filling. Use a stand or electric mixer on LOW speed to mix the ingredients, making sure not to over-mix. (Make sure to reserve 6 tablespoons of espresso for the next step.) Pour half of the cheesecake filling into the spring-form pan.
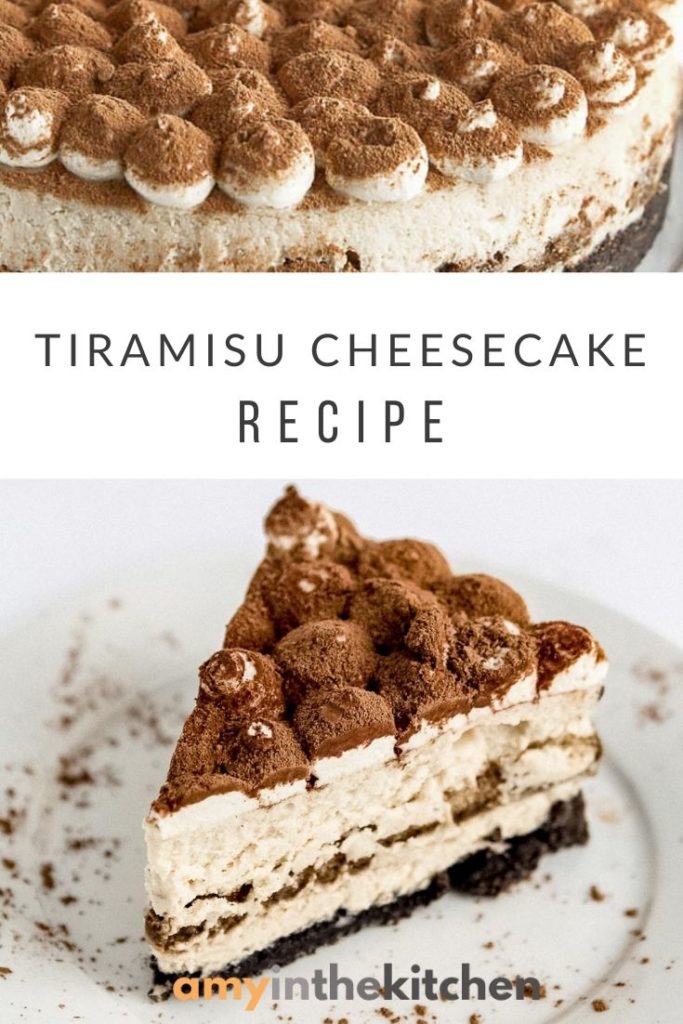
- Layer the filling: Dip the lady fingers in the remaining espresso and arrange them in a single layer over the filling. Carefully pour the remaining cheesecake filling over the lady fingers and smooth the top with an off-set spatula.
- Bake: Insert the spring-form pan into a 10" cake pan and place the cake pan into the water bath.(Water level should cover half the depth of the cake pan. Add water if needed.) Bake for 1 hour at 320°F.
- Cool: Turn the oven off and let the cheesecake cool in the oven for 1 hour with oven door cracked. Remove the cheesecake from the oven, run a knife around the edge of pan and let the it cool completely on a heat-safe counter top.
- Chill: Place the cheesecake, uncovered in the refrigerator overnight or a minimum of 6 hours to set. (Do not remove the spring-form pan.)
- To serve: Before you are ready to serve make the whipped topping and decorate the top of the cheesecake. Dust with cocoa powder and serve.

Tips for success
Don't over mix the filling when mixing. Air incorporated into the batter will result in cracks on top of the cheesecake.
The center of the cheesecake should be jiggly after baking. As it cools, the center will continue to bake and firm up in the fridge.
A water bath is recommended for the best results. The steam from the water keeps the oven moist and the warm water surrounding the pan bakes the cheesecake evenly from the outside to the center.
Make the water bath leakproof by placing the 9" spring-form pan into a slightly larger 10" cake pan before inserting it into the roasting pan. The cake pan will form a barrier that will prevent water getting into the cheesecake's crust.
Check out our tutorial for step by step instructions on How to Create a Leak-Proof Water Bath for Cheesecakes.
How to store tiramisu cheesecake
- To Store: Keep leftovers covered in the fridge for up to 5 days.
- To Freeze: Place the cheesecake in the freezer, without topping, until frozen solid. Wrap with plastic wrap and a layer of foil. Keep frozen for up to 3 months. When ready to serve, allow to thaw in the fridge overnight and decorate with the whipped topping and cocoa powder.
5 must try cheesecake recipes
Do you love cheesecake as much as we do? Here are 5 easy cheesecakes to try for your next party!
Tiramisu Cheesecake
Ingredients
Crust
- 24 Oreos including the cream center
- 1 teaspoon instant espresso powder
- 6 tablespoons unsalted butter melted
Cheesecake Filling
- 32 oz. cream cheese room temperature
- 1 cup granulated sugar
- 2 tablespoons unsalted butter room temperature
- 2 large eggs room temperature
- 2 teaspoons vanilla extract
- ¼ cup flour
- 12 lady finger biscuits
- 1.5 Cups prepared espresso or very strong coffee Separate 6 tablespoons to use in the filling, the rest will be used to dip lady fingers
Whipped Topping
- 8 oz. heavy whipping cream
- 4 oz. cream cheese room temperature
- ½ cup milk
- 1 packet white chocolate instant pudding mix or vanilla flavored
- ¼ cup cocoa powder
Instructions
- Preheat oven to 350°F and line a 9" spring-form pan with parchment paper.
- Make the crust: Place the Oreos and instant espresso powder into a food processor and pulse until a fine consistency. Pour in the melted butter and pulse until fully combined. Press the mixture into the bottom of the spring-form pan making sure it is compact and bake for 10 minutes. Remove and set aside to cool while you make the filling.
- Prepare the water bath: Turn the oven down to 320°F. Place a large roasting pan in the oven on the middle rack. Pour hot water into the pan, making sure it is about 1" in depth. Close the oven door.
- Make the filling: Using a stand or electric mixer, beat the cream cheese, butter and sugar on low speed until smooth. Scrape down the sides a few times. Add eggs one at a time making sure they are fully incorporated after each addition. Add the vanilla extract, 6 tablespoons of prepared espresso and flour, scraping down the sides of the bowl as needed to make sure everything is well combined. Pour half of the cheesecake filling into the spring-form pan.
- Layer the filling: Dip the lady fingers in the remaining espresso and arrange them in a single layer over the filling. Carefully pour the remaining cheesecake filling over the lady fingers and smooth the top with an off-set spatula.
- Bake: Insert the spring-form pan into a 10" cake pan and place the cake pan into the water bath. (Water level should cover half the depth of the cake pan. Add water if needed.) Bake for 1 hour.
- Cool: Turn the oven off and let the cheesecake cool in the oven for 1 hour with oven door cracked. Remove the cheesecake from the oven, run a knife around the edge of pan and let the it cool completely on a heat-safe counter top.
- Chill: Place the cheesecake, uncovered in the refrigerator overnight or a minimum of 6 hours to set. (Do not remove the spring-form pan.)
- Make the whipped topping: Beat the heavy whipping cream until it forms stiff peaks. In a separate bowl, beat the cream cheese, milk and instant pudding until completely smooth. Fold the whipped cream into the cream cheese mixture until it is fully incorporated.
- Assemble: Remove the spring-form pan and place the cheesecake on a serving platter. Place the whipped topping mixture into a piping bag with a large tip, I used Wilton 2A, and then decorate the top of the cheesecake by piping large dots. Dust the top of the decorated cheesecake with cocoa powder and keep chilled until ready to serve.
Notes
- To Store: Keep leftovers covered in the fridge for up to 5 days.
- To Freeze: Place the cheesecake in the freezer, without topping, until frozen solid. Wrap with plastic wrap and a layer of foil. Keep frozen for up to 3 months. When ready to serve, allow to thaw in the fridge overnight and decorate with the whipped topping and cocoa powder.
This recipe was originally posted in January 2016 and updated in July 2018. Lady fingers were removed from the crust ingredients.
marla says
just wanted to check to make sure the oven temp is 320 degrees
Amy Duska says
That is correct! I will clarify that in the instructions
waffle911 says
Made two tiramisu cheesecakes for a pot luck dinner party tonight. Smashing success. My father decided he wanted to figure out how I can commercialize my cheesecakes as a side gig, though I don't think I could pull that off as well as an actual bakery. (I also do a pumpkin pie cheesecake for thanksgiving, and last St. Patty's I did a 'Dublin Mudslide' chocolate cheesecake with Bailey's and Kahlua)
However, I did not try the recipe as it is seen here. I deviated from this and incorporated some ideas from the recipe and user feedback on Allrecipes. That recipe on Allrecipes by itself is considered mediocre in practice but uses some alternate ingredients actually seen in tiramisu, and the comments offer a lot of improvements. Comparing the "fixed" version of that one to this one I figured out how I wanted to make mine different.
I wanted to do it differently because I wanted my own, and I wanted to stay a bit truer to actual tiramisu, which doesn't traditionally feature white chocolate, and usually incorporates...
"Where has the rum gone?"
Yes, rum is one of the two prominent flavorings in Tiramisu, alongside espresso. This is why I pulled up the Allrecipes ingredient list to mix with this one; it uses Kahlua, which is a coffee rum liqueur. Baking with alcohol isn't to everyone's taste, but I like me a boozy cheesecake, which you may have already guessed after mentioning the Mudslide cheesecake.
What exactly did I change?
- Crust -
Since I don't have a food processor, I put the Oreos and lady fingers in a gallon Ziploc bag and crushed them out with a rolling pin (which I do for all my cheesecake crusts). Less mess to clean up when you can just toss the bag when you're done. From Allrecipes and its comments, I reduced the butter from 6 Tbsp to 4 Tbsp, which affords a bit more "budget" for moisture content to replace espresso powder with 1/4 cup Kahlua instead.
Result: Crust was a bit too moist, definitely needs more than the 8 minutes I had it setting in the oven.
Future changes: Leave it in the oven for 10 minutes to fully set, increase 2 more minutes if that still isn't enough. Maybe refrigerate the crust while making the filling? Instead of Oreos, I would use Nabisco Famous Chocolate Wafers, which are very nearly the same chocolate cookie in a different shape without the cream filling which it really doesn't need in this crust. Used in the St. Patty's Mudslide cheesecake I made before. Arguably doesn't need a chocolate element in the crust, could do all lady fingers instead, but a bit of bitter chocolate in the crust is a nice balance to the sweet filling.
- Filling -
Substitute one block of cream cheese with 8oz marscapone, like what would be used in actual tiramisu. It's like Italian cream cheese, bit different in texture and taste. Difference might be subtle, but it's there, and my local grocery chain has marscapone in stock at a reasonable price. Coffee - I'm not a coffee drinker, I don't have anything used to make real coffee or espresso. But I'm not making coffee flavored cheesecake, either. So no coffee this time. 1/2 cup Kahlua instead of the 1.5 cups of espresso. Lower liquid content probably helped with setting the cheesecake, too, but it probably could have used 1 whole cup of Kahlua, if not for the ladyfingers. I dipped/doused them in Kahlua since I didn't have espresso. Also, I always leave mixing in the eggs to the very end since eggs seem to trap the most air in the batter when mixing. Adding eggs in too early can make it easier to overmix, making it too fluffy and soft to set properly.
Result: Ooh, the ladyfingers deliver a bit stronger rum flavor than I intended, but that thankfully played out well with the more mature crowd at the potluck who seemed to really like the kick. Needs more espresso flavor to really get that tiramisu flavor balance, I think.
Future changes: Redistribute the alcohol, use real espresso. 1 cup Kahlua in the filling itself instead of 1/2 cup to get the rum flavor in the filling where it isn't so concentrated and blends more with the sweet cream cheese and marscapone. (Costs aside, I wonder if you could skip cream cheese altogether and do all marscapone instead?) Dip the lady fingers in espresso instead of Kahlua because they really take on that rum flavor if you let them; having them offer up more espresso flavor instead might be the balance improvement I'm looking for to nail that traditional tiramisu flavor.
- Topping -
Skipped it. Tiramisu is kind of simple and delicate in its composition, even if it can be a bit complicated in execution. On top of tiramisu, it's just another layer of rum-mixed marscapone with a dense dusting of sifted cocoa powder, maybe mixed with some espresso powder. So that's what I did, dusted it with cocoa powder and left it alone. While I'm sure the white chocolate whipped pudding is a lovely topping and works well with the mostly coffee flavored cake in this recipe, white chocolate isn't used in traditional tiramisu, and it's not what I was going for on this one.
Result: It's hard to go wrong with a thick dusting of cocoa powder and nothing else. It's simple, it's traditional, it works, it made it apparent to curious guests at the pot luck this cheesecake had something to do with tiramisu.
Future changes: I had a go at shaving an 85% cacao chocolate bar, but of all things I don't seem to have a peeler in my new kitchen, and anything else I tried just kind of crushed the chocolate or grated it. I think chocolate shavings would be a nice touch and add a bit more visual texture to the finished cake without taking things too far.
Thanks for the recipe, it made a great starting point for something new and different which garnered a lot of attention and positive feedback at the big shindig. My dad's friends might be be talking about this one for a while.
Sophie says
I’m thinking of making this Saturday morning for Saturday evening. Will it set if done on the same day?
Amy Duska says
I would make sure you have a solid 6 hours in the fridge!
Christine Foster says
Just made this for a birthday party. Everyone raved about it! Looked fabulous! Beat out a chocolate ganache tart by far!
I changed the recipe because what is Tiramisu without mascarpone??? So I did 1/2 cream cheese 1/2 marscarpone. In addition to the espresso in the filling, I sprinkled instant espresso powder at the very end of the filling mixing just before pouring into the form. It made beautiful swirls and really looked nice plus added a punch of coffee taste! I also reduced the flour from 6 TBS to 4 TBS. I have never used flour in my cheese cakes, so this was a 1st for me. It took away a lot of the mascarpone taste away and that is why I punched up the taste with the espresso powder.
For the coffee for the lady fingers I used espresso AND Kahlua. You can use Tia Maria as well.
Re the topping....once you add the jello it gets VERY firm and had to use my kitchen-aid mixer for this. I found it impossible to "fold" in the the whipping cream, but used the kichen-aid beater and gently stirred it in to totally incorporate it. Instead of getting a piping bag, I used a sandwich sized ziplock & filled all the topping mixture and cut a hole at one of the corners....very disposable. The amount fits perfectly in the sandwich size. Once piped on the cake, I sprinkled special dark cocoa AND more instant espresso powder.
Froze the leftovers and will see how it holds up. It was a HUGE success and will be made again! GREAT recipe! Thank you! Loved the crust!
Judit says
Hey there! I am willing to make this cheesecake but they don't sell Jello where I live. What substitute can I use? Thank you.
Amy Duska says
Hi Judit, I would just make a homemade whipped cream and use it for a simple topping.
Derek says
This is easily my and my family's favorite cheesecake now.
I've made it a couple times as-is, minus the water bath. I just don't have a large enough oven-safe dish to do it in, and since the topping is going to cover any cracks it doesn't really bother me. It turned out amazing both times. And it's so simple!
I and my family all really love cinnamon, so I've also made a modified version of this recipe, substituting Biscoff cookies for the ladyfingers. 14 Biscoff equal 12 ladyfingers going by weight. And you have to be careful when pouring the top lair so you don't displace the cookies(easier because they are individually lighter, I think). Then I mix some cinnamon into the cocoa powder before sifting it onto the top to tie everything together. If you love cinnamon, this is amazing. If you don't, well, this probably isn't such a good idea for you. 😉
And that topping! It's a pretty simple dairy replacement that has quickly become my go-to way to make pudding, period. It doesn't add very much time, and it's just so much better than making pudding with all milk.
So thank you for sharing!
Jennifer Welch says
Hi did you use the crisp ladyfingers or soft ones?
Amy says
I used the soft ones because that's all my super market carries, but you can use the hard ones too! The crisp ones are probably easier to handle.
M Janknegt says
Could you use mascaparone with the whipping cream instead of the pudding?
Amy says
I've not tried that, but I'm thinking it may not set up as firm. I'm sure it would taste very good!
Rebekka says
Hi Amy
This recipe looks amazing 🙂 I plan on making it for New Years Eve. However, I live in Denmark, where it isn't possible to buy 'Jello white chocolate instant pudding mix', which is required for the whipped topping. Do you have any suggestions as to what else I could use?
Amy says
I would use a vanilla flavor if you can't find the white chocolate.
Lisa says
Hi Amy,
I will be making your tiramisu cheesecake for Christmas Eve. Do you spray the sides of the springform pan with non stick spray?
Also, do you put this in a water-bath? Does it stay in the water-bath when you let it stay in the oven to cool for 45 minutes. Or do you take it out if the water-bath to sit on the oven rack?
Amy says
I don't spray the sides. I run a sharp knife around the edge before I put in the fridge to chill. I let the cheesecake sit in the water bath until I remove it from the oven.
Tim says
I made this tonight! Pretty simple, but definitely use parchment! Mine stuck to the pan and while trying to remove and crumbled a bit... very delicious!
Rebecca W says
What size jello packet do you use?
Amy says
The 3.3 oz. packet.
Nicki says
This recipe looks amazing! Do you keep your crust as a bottom layer or do you work up the sides of the springform?
Amy says
I just use it for a bottom layer. You could certainly work it up the sides but I like to see the edge of the lady fingers peaking out 🙂
Bryan Derr says
I made this and as a cheesecake fanatic this is one of the best I have ever had. I used a home made recipe to make my own lady finger cake....
Amy says
Hi Bryan, so glad you enjoyed this recipe. Happy holidays!
Linda says
This cheesecake looks so good! My only question would be... Does the jello pudding mix go directly into the recipe or do I follow the jello instructions to make the pudding and then add it?
Amy says
It goes directly into the recipe!
Carrie says
I am attempting this recipe because it looks and sounds amazing! My friends and I are doing a cheesecake bake-off for my friend’s birthday. I followed all of the instructions and ingredients but for some reason the lady fingers floated to the top of the filling when I poured the second half of it on top of them! 🙁 🙁 I can’t figure out why. I put it in to bake anyway just to see what would happen and like I thought, I basically have a layer of filling-coated lady fingers baking on top. Oh brother! Any thoughts would be appreciated!!
Amy says
Oh my gosh ... I've never had that happen to me before. Did you soak the lady fingers in the coffee before placing them in the layer?
Carrie says
I did! Maybe I didn’t let them soak long enough to be heavier in the batter? I don’t know. I will say I’m not experienced in cheesecake baking but the filling seemed pretty liquidy to me after adding the 6 Tbls of espresso. I followed everything so I’m not sure. Is it possible the cream cheese and butter were TOO soft at room temp? No idea!
Amy says
Have you baked it? Did it come out ok? I'm dying to know!!
Sammie says
I had to visit your blog to see how this incredible cheesecake is made. I was practically drooling as I pinned it on Pinterest. Thank you for sharing such an incredible dessert.
Amy says
Thanks Sammie! 🙂
Amber says
Is the cocoa powder supposed to be unsweetened cocoa powder or more of a hot cocoa mix? Thank you!
Amy says
Unsweetened cocoa powder ?
Ken says
Currently making this cheesecake. Have you frozen this cheesecake with the whipped topping on it? I wonder how the whipped topping will hold up.
Amy says
Hi Ken, I haven't frozen the cheesecake with the topping. I think it's worth a try. If it doesn't thaw well, you can always scrape it off and make new topping.
Gurpreet Thumma says
Hi Amy,
How do I convert this to mini cheese cakes. I need to make about 70 for a party, so am thinking this,maybe red velvet and NY cheese cake.
Thanks,G
Amy says
Hi! This might be a little tricky to make into mini cheesecakes. What size will they be?
Claire says
Maybe try Necco wafers instead of lady fingers?